Showing posts with label craft. Show all posts

Friday, December 7

Stamped Wood Ornaments!

So this year for my ornament party I have decided to do something along the same lines as my natural christmas wreath.  I love the look of the cut circles of wood especially with the bark still on the wood. 
 
I had wanted to make some reindeer ornaments that were made out of wood so an idea was born. I decided to try stamping onto the wood and it turned out darling! 
I thought about drilling a hole in the top to loop a ribbon through but the wood is still soft and I didn't want to crack it.  So, I just glued a ribbon on and added a bow made from the same ribbon.  Here is the finished project!  I especially love how the brown ink of the stamp almost makes it look like it could have been burned into the wood.

 
Hope you have a great time decorating your Christmas tree and have a Merry Christmas!


Tuesday, November 27

Christmas Advent!


So there are sooo many cute ideas in the blogging world doing a Christmas advent so I decided to make one too.  Mine is really simple.  Did I say simple??? 

I used some No. 1 coin envelopes from the local Staples and some number stickers.  The stickers I used were from Oriental Trading Co. and they had them on clearance 2 sheets/ $5.00.  Not the best deal but they are cute and with the colors, I did not feel that I needed any other decoration. 

First, take your coin envelopes and put the sticker on them.

Second, put the slips of paper with the Christmas activities into the coresponding envelopes.  (This was the hardest part, I had to look onto pinterest for some ideas.  Who knew that 24 activities would be so hard to come up with?)

Third, drape a piece of ribbon or yarn across the place you want the advent to hang.

Fourth, take your clothespins and attach the envelopes to the ribbon.


Done!  Did I say simple yet??  This ended up costing me around $15.00 ($5 for stickers, $6 for envelopes, and $4 for the clothespins.)

I am looking forward to doing the activities with my kids and I can save these envelopes and re-fill them for next year!

Enjoy!

Tuesday, November 20

Paper Christmas Stars!

I found this post on pinterest the other day and had to try these.  Check it out the stars that I made and this tutorial for a fun, fast way to make some cute Paper Stars!

The larger stars were made using paper that was 6" x 6" and the smaller stars are made using paper that was 4" x 4".

Here is the tutorial: Paper star ornaments

Enjoy your crafting!

Friday, November 16

Recycled/ Natural Christmas Wreath!

It has been a while since I have posted.  I have to be honest and let you know that my creative juice has been empty and it is finally starting to fill up again.  I am in love with the natural materials that you see around being used for various things and I wanted to make something using natural wood.  So when my husband and I were out in the mountains cutting some firewood - I snagged a perfect sized branch for me to use.  This was an easy craft and I hope you enjoy it.

 
So I started with a log about 2 inches in diameter and using my husband's chop saw I cut this log into slices about 1/2 inch thick. 
 
 
I then laid the pieces out to a rough circle. 
 

I then started to glue.  I tried some wood glue but it took too long to dry and my husband said that the wood was still pretty green so it would take forever.  Second, I tried my hot glue gun - my go-to tool and started gluing like crazy.  That worked but I had to re-inforce it on the back with some popsicle sticks to help hold it. 
Last, I put a ribbon on it - with hot glue, of course, and put my coke 3D stars on the wreath.  I found a tutorial for the stars at: Recycled drink can stars - In the tutorial she painted them but since I LOVE my coke and on one of them there is the cute polar bear, I left them the way they are.  Besides they are red so it is already festive.  Here is another photo of the finished wreath. 

 
I love how this wreath turned out and the best part is I used some old soda cans and wood that we harvested for our firewood so it didn't cost me anything.  Let me know what you think!


Tuesday, September 18

Halloween Wreath!


I am loving the fact that Halloween is just around the corner.  I have to say that this is my favorite holiday to decorate for.  I have always been the kind of person who would love to watch scary movies and scare myself silly.  One of my memories as a child is my twin sister hiding under my bed and waiting till I came to go to bed.  She would then grab my ankles and I would scream like a little girl and we would laugh like crazy.  I loved to follow her up the stairs because she hated to leave the basement with the dark behind her.  It makes her run faster when you would hit the stairs next to her feet.  To this day, her kids say that she runs upstairs.

To the craft portion of this post ;) - I had some extra grapevine around and decided to make a halloween wreath with it.  So I made a circle wreath using the grapevine and then found some halloween colors of ribbon and tulle and added those to the wreath.  Then I had this darling little frame that I found in the $1 bins at Target (gotta love those bins) and added a Trick or Treat sticker to it.  Then just hot glued the frame to the wreath and Voila!  The Halloween wreath is born!   Hope you enjoy the craft and enjoy your frights as much as I do.


Tuesday, June 26

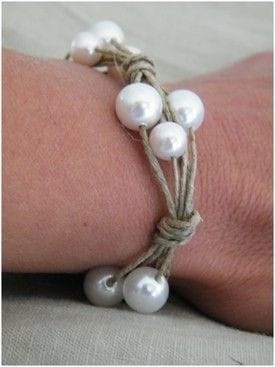
Bracelets and Rings!

These week has been crazy just with trying to keep kids entertained, house clean, etc.  Sometimes I think that summer is more work for moms even though we are not helping with homework, shuttling kids to school, and all that.  No, Summer is just full of baseball games, carnivals, "Mom, I'm bored!", and all of the kids (including the neighbors' kids) asking for a snack or popsicle.  So this week I am going to post what fun things I found time to make that have been on my to do list in pinterest for a while now. 

First, I have been loving the bracelets on pinterest and have quite a few earmarked and only made two.  I made this bracelet:


I used the idea from this bracelet but used suede lace instead of the twine she mentions in her tutorial.


Second, I made this bracelet -


I made it using this bracelet as my inspiration and a few beads from a tophatter auction.


My last craft to show off is the bended spoon ring.  I had a old baby spoon that had a cute heart on the handle and I thought that it would make a cute ring.  It was easier than I thought to make and I admit that I am going to go to the thrift stores to find more spoons to use and make more.


I found the instructions on this website:


Hope you have enjoyed your week and found some time to craft too!


Wednesday, June 13

Fun black & white cards!

I have been doing some cards lately because I sell them at a booth in Signs and Wonders store in Spanish Fork, Utah.  They are something that I sell a fair amount of so I needed to replenish my stock.  I saw some cute cards using everyday items as a word play and decided to use that as my inspiration.  So these cards were born: 


Here are some close-ups of each card:
I found the graphics on a website for free graphics and used my word processing program to make the sentiment. 
On this card, I made the flower using strips on paper that were 1/4" wide and 3 1/2" long.  Using some glue dots, I folded them over and stuck it in the middle and then held them all together using a brad. 
Here is the last card - isn't it darling???

Have fun crafting!


Thursday, May 31

Summer Fun Part 1 - Pizza, Park, and Bubbles!

So- today was the first day of my summer fun with the kids.  As I mentioned before in the last post, I am planning on doing something with my kids each Thursday to show them that you can have fun even without the big vacation.  I decided to go a little low-key with the celebration this day because of my lack of energy with coming down with my annual summer cold.  So, here is what we did for a total cost of  $6.00 (plus tax).

Cheese Pizza -thanks to Little Caesars Hot and Ready Pizza.
Park time - always a favorite of mine since it is free and for the kids because well, who doesn't love swings and slides?

Then we came home and made bubble pictures.  I found a three pack of bubbles at the dollar store and used some food coloring and little cups to mix the colors.  The kids then had fun on the front porch making the pictures.  Here are some pictures of the buggers - minus the baby (18 mos) because he wanted to play in the colored water more than anything and it doesn't come out easy.  Also, as you can see in the pictures, the water ends up mainly on the porch so that is why we did it outside.  My kids are notorious for spilling anything liquid.


I got this idea for the bubble pictures here :


I don't think ours turned out as well as the ones on her website but the kids loved making them.  I think it was a great day with the kids and they will have some good memories without spending a lot. 
Enjoy your summer!


Wednesday, February 22

Spring Wreath!


Some of you followers may recognize the base of this wreath since it is the same as the base of the winter wonderland wreath in a past post.  I used an old frame and added some grapevine wreath to form the round wreath in the center. 


Since this is the same then I will not bore you with the details of the construction of the base of the wreath.  So onto the next step! 
I found a cute little clipart of a chick that used circles and I knew that I had a circle of wood so I decided to put this cute little chick on the spring wreath.  Here is a picture of the items used for the chick!

There is one googly eye, one chipboard heart for the beak and a chipboard scalloped circle for the wing.  The legs were made using some twigs I had left over from making the grapevine wreath.  I painted it a sunny yellow and then hot glued the legs and the other parts on.  Here is a close up of the chick on the wreath.


Last step to the wreath was to put a white tulle bow and a twine bow on the top. 


I love how simple and cute it is.  Hope you enjoy this craft too.


Sunday, January 29

Love Sign!


My little sister is getting married and I so wanted to do something cute for her wedding shower.  I made this a couple of weeks ago but wanted to wait until after I gave it to her since she is a follower of my blog and I didn't want her to see it before hand.  I found this quote on pinterest and knew that it would make a great sign for her and their home together. 
Supplies needed:
white acrylic paint
vinyl letters cut out in the saying (2" for the LOVE YOU and 3/4" for the rest)
board - I used an old drawer front that I found at the Habitat for Humanity.
Patience!  - it takes a lot of it for placing the letters and then peeling them off.

I cut out the vinyl letters using my cricut but I will probably find some stickers for the next time I try this.  Lay them out on the board the way that you want them.

Second, I painted over the stickers and everything using white acrylic paint and a foam brush.  I put a couple coats on since the drawer was a cherry finish. 

Third, peel off the stickers carefully since the paint does want to come up a little.

Last, I sanded the edges and distressed it a bit. 

Finished!  I can tell you that I love how this sign turned out and would do it again.  This last picture has some LOVE scrabble tiles that I made for her too. 

Enjoy your crafting!

Friday, January 20

Tulle Valentine Wreath!


So I found some darling tulle that was a hot pink with little hearts on it and I wanted to make something for my little girl but then I knew that I needed to make some decorations for Valentine's day and I have been seeing wreaths made from tulle around for ages and thought I would try it for Valentine's day. Here are the supplies I started with:


I show some burlap with the picture but I didn't end up using it.  So I cut lengths of tulle from the white, pink, and hot pink and tied them on the frame.  I made a heart out of popsicle sticks and it didn't turn out - call it a huge miss to put on the wreath with it but I think it looks great the way it is.  It was an easy craft and as my husband says it is a little foo fooey but I like it.

By the way, here is a picture of the heart miss in case you can give me any hints on what to do with it......

Enjoy!

Tuesday, January 3

Scrabble tile LOVE!

I love to play scrabble and the simple design of the tiles so when I started to see some crafts in the blogging world using scrabble tiles, I feel in love.  I wanted to use the scrabble tiles but wanted them a little larger so I decided to make my own.  I used a piece of craft wood that you can buy at any craft store and cut it to square lengths as you can see in the picture below:
I then got out my Cricut machine and cut the letters and numbers for the tiles.  I used vinyl but you could use any paper and then just modge podge it on.
After that, I struggled for a minute on what to connect the tiles with but remembered a Valentine craft my sister did over at Craft Affection and decided to use ribbon.  I could not find any tacks like she used for her crafts to I got out my trusty hot glue gun and glued the ribbon/lace on the back of the tiles.
Last but not least, I made a loop of lace for the top to hang the finished product and added a bow of the same lace so I could highlight the lace a bit more.  Here is the finished product on my wall. 

I planned on making this for my booth down at Signs and Wonders but decided it is too cute and I will have to keep it.  I made it for Valentine's decorations but it is not overly pink and red so I can use it all year round.  Hope you enjoy the craft and let me know what you think!


Linking too:
Today's creative blog
My Uncommon Slice of Suburbia
Skip to my lou
Someday Crafts
Gluesticks
Somewhat Simple