Saturday, December 31

Top five tips for organizing for New Year!

So what are your New Year's Resolutions? 
With the New Year coming I have been thinking on this and I decided that the main resolution for me should be to better organize and prioritize my time.  That will be an ongoing goal since you can always find room for improvement when it comes to that.  I  have browsed the land of blogs and pinterest and have come up with some links that can show us some tips on organizing and prioritizing our time.  Here are 5 of the top tips/links to organization that I found helpful:


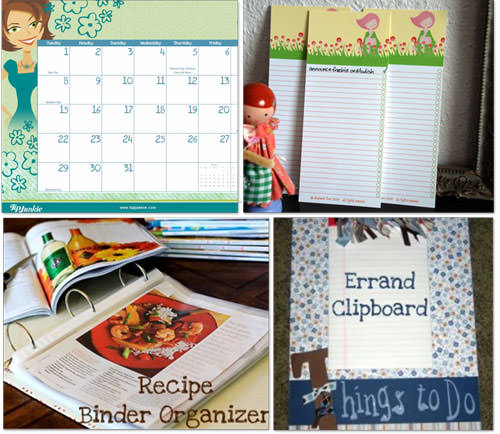
 #1:  Over at Tip Junkie - Laurie has given us 32 of her favorite tips on organizing tips.  The one I know I will be implementing is the errand clipboard and the recipe binder.  You should see my recipes they are scattered into a million different folders, etc. 


#2: The next is a phone charger made from an old bottle of lotion.  I always have baby wash bottles that are going in the trash and what a great way to re-use one to get the phone off the counter and out of the way!  Thanks to inhabitat for showing us how to make this!

02docJ

#3:  Is an article found at Wall Street Journal about the 25 Documents you need before you die.  I know, I know it is a morbid subject but how many of us want to leave our children or spouse the burden of taking care of it all if the unmentionable happens?


#4:  Is a weekly cleaning list that Ashley over at evelynkatedesigns.com shared with us on a post about the chores of cleaning the house when she was put on bed rest.  I like having a checklist to mark things off as I do them because then I can see what I accomplished. 

Pinned Image

#5:  This last idea was uploaded by a user on pinterest and I thought it was an awesome idea to easily hang up and put notes on without taking up a lot of space for a calendar.  It is also inexpensive so it has another check in my book. 

Thanks everyone for the ideas and I hope you can comment with your New Year's resolutions so you can give me even more help this year! 


Thursday, December 29

Yet another birthday...cake!

First, I wanted to thank everyone for your support and thank all the followers and readers for helping me with this blog.  I appreciate your support and your comments and I hope this next year will be even better with more crafts and fun for you and me.

So onto my post - my boy #2 had his birthday yesterday and I always ask them what they want for their birthday cake.  He had told me that he wanted a monster truck cake for forever and so I had a few ideas about what to do and was not stressing about it.  Then after Christmas was done, I asked him again what he wanted as his cake and he said that he wanted a Dinosaur cake.  His birthday was the next day and I had not a clue what to do so off to pinterest I go.  I love that site!  I found a cake that looked pretty simple but cute for here and decided to make it.  The only other request that he had was that he wanted it green with blue dots and it had to have teeth.  So I cooked the main cake in a bowl and made the head out of rice crispies and the tail is just from rolled fondant.  I think it turned out cute and I know that he loved it.  So let me know what you think. 


Thanks for reading,

Friday, December 9

Snowmen ornaments


I mentioned in my last post about ornaments that I had made for my annual ornament party and that I had hoped to post my ornaments that I am making for this year's party.  Well, here they are!  I saw on pinterest (the link is to etsy.com) some cute snowmen made by using blocks of wood and burlap hats so I decided to make a minature version for the ornaments. 

Supplies used:
burlap (8" x 4 1/2") for cap
cream paint
orange, black, and white paint for face
blocks of 2x4 (1 1/2" wide)
hot glue
twine

I used 2x4s of course... and cut them to be around 1 1/2 inches wide.  Then I sanded them and painted them a cream color.  So they looked like this:

I then painted the face on them.  I used the wrong end of the paint brush to make the circles and carrot for the nose so it turned out like this:

Next, I used my trusty hot glue gun to glue the piece of burlap for the cap.  I folded it about 1/2 inch and placed it around an inch from the top of the block.  Starting on the back I put the folded side towards the bottom and then glued it all around.  Lastly, I used a piece of twine to tie the cap.  This is the finished product:
I loved how they turned out and think that I might have to make the larger version of this anyway.  What do you think?

Enjoy your crafts!